OMNeT++ General 'Network' Simulation
OMNeT++
In this article I will look at OMNeT++ which describes itself:
"OMNeT++ is an extensible, modular, component-based C++ simulation library and framework, primarily for building network simulators. "Network" is meant in a broader sense that includes wired and wireless communication networks, on-chip networks, queueing networks, and so on. Domain-specific functionality such as support for sensor networks, wireless ad-hoc networks, Internet protocols, performance modeling, photonic networks, etc., is provided by model frameworks, developed as independent projects. OMNeT++ offers an Eclipse-based IDE, a graphical runtime environment, and a host of other tools. There are extensions for real-time simulation, network emulation, alternative programming languages (Java, C#), database integration, SystemC integration, and several other functions."
I discovered it when searching for Network simulation tools in the sense of TCP/IP etc. OMNeT++ can be used for this purpose but is a much more general tool. It is a discrete event simulator and can be used to model many different scenarios. Whilst I did not set out to use a tool in this way, it has become obvious that it would be very helpful. I plan to develop a new network protocol as part of my academic studies. When coming up with the algorithm which implements it then it would make sense to first do it in an abstracted environment. Once it is proven there then I can begin to layer on the real world network stack.
To that end in this article I will be looking at OMNeT++ as a generic modelling tool. I will not therefore be applying the criteria I assigned in my previous article Evaluating Network Simulation Tools. I will come to this in a follow up article where I look at OMNeT++ in combination with INET which I hope will cover my network simulation needs.
Background
OMNeT++ has been around since 1993 and was developed by András Varga at the Technical University of Budapest. It is actively developed with the current ,at time of writing, version 4.4.1 having been released in March 2014. It is not fully Open Source but is released under the APL which is basically an academic version of the GPL. This means you can freely use it and have access to the code for academic and personal use but if you use it commercially you need to get a paid licence. There are no prices on the website and you will have to contact, with the price presumably being related to industry and the number of users. Whilst I would prefer it to be properly open source the situation is a reasonable compromise. It is free to use for my studies and then if I need to use it commercially I would have to pay but would get support.
Installation
I installed OMNeT++ on an Ubuntu 14.04 machine and followed the instructions here. They are quite straightforward and cover installation on the supported platforms (Windows, Mac, Linux, Unix). This installed the IDE which is Eclipse with integration for OMNeT++ as well as the libraries and samples for running simulations. INET does no come as standard but it is available through the IDE menus as a simulation model.
First Run
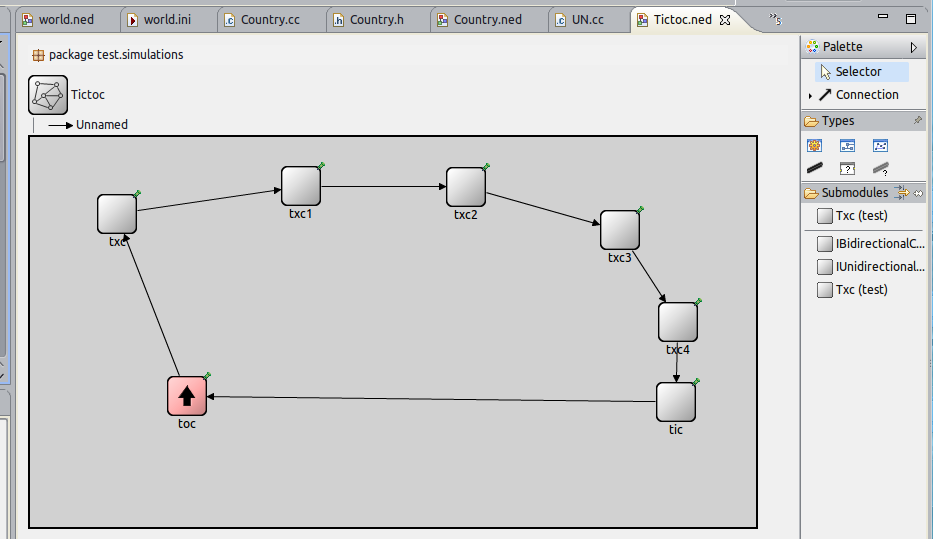
When you first run the program you are presented with a welcome screen. If you are familiar with the Eclipse IDE then you will be right at home. You have links to the documentation and also to a tutorial called Tic-Toc. This is an excellent place to start and was where I dove in. The model is very simple, but serves as an introduction, it has two nodes which pass a message between each other. It just tic-tocs back and forth and you can see this visually when you run the simulation. The tutorial is quite progressive though and by the end you have a multi node message passing model with statistic gathering. Along the way you learn the main elements of writing a simulation.

Coding your Model
Models in OMNeT++ are made up of modules these can be compound and nested to any level. The simplest module is called a simpleModule and it is here that you right the logic of your model. You do this, as might have been guessed by the name OMNeT++, by writing in C++. You extend the cSimpleModule class and at a minimum override two methods: initialize() and handleMessage(). The IDE provides a template for you through the New Menu.
The choice of C++ makes sense as it is a low level language and potentially very efficient. This will be important if you end up running a simulation with millions of events. It really helps if you already know C++. I have programmed in C++ a fair amount in the past but lately have been using much higher level languages like Python. If you come from a Java, Python or other high level programming language then you will have to be careful. You do not have a Garbage Collector running around after you and therefore have to look after your own memory. I was reminded of this the hard way when one of my models began to grind my computer to a halt. I could see that it was using several gigabytes of memory. All I had to do was delete a message after it was used to stop this.

If you look at the output console when you stop the simulation then it is good at telling you what has not been freed and you can go and fix your code. C++ does have a standard library (STL) which comes with many convenience functions but it is nowhere near as extensive or easy as something like Python. You can of course link to external C++ libraries like BOOST if you want more features. Given you are generally just implementing simple rules and algorithms this should not be too limiting.
Running a Simulation
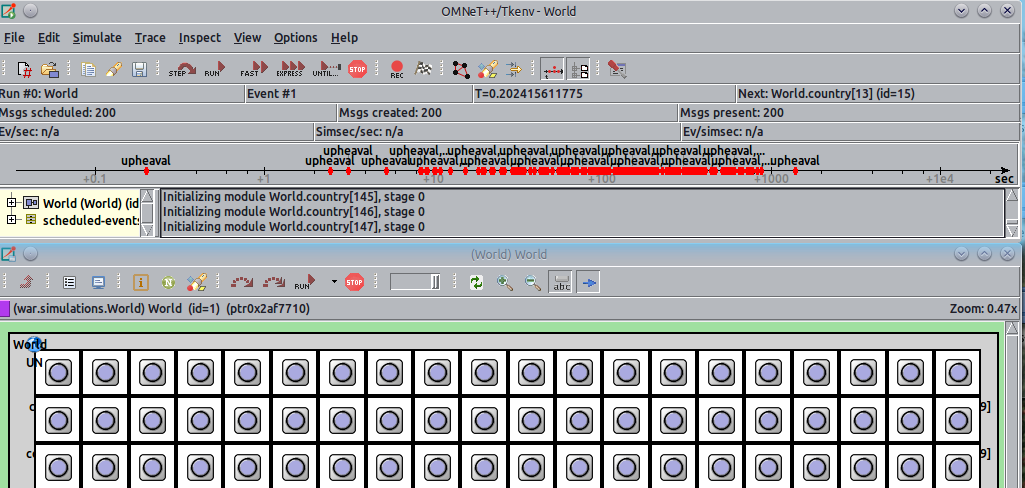
By default when you run a simulation if brings up a GUI. This lets you start, stop and speed up the simulation. At normal run speed you see the messages pass between nodes. If you select Fast or Express then you will only get sporadic updates on the GUI and the simulation will run much faster. The simulation will run until there are no more events to process or you press stop. You can also limit the simulation time or CPU time that it can use and it will be stopped if it exceeds it.

During a simulation you can inspect the modules by double clicking on them. You can see information about the internal state, this can include you own variables which you have to set up for this (covered in the tutorial). You also have a timeline that shows upcoming events and a log area that shows output from the running module. You can print to the output within your C++ classes which is handy for debugging.
The GUI is a nice visual way to see your simulation in action but it is quite slow. It does not scale up well to multiple nodes and connections. I tried 800 nodes and it warned me it would take a while to draw and then took several seconds. When I ran a model with over 5000 nodes I gave up waiting for it to draw. This is a little disappointing given a modern graphics card can do north of 500 Million polygons a second it really should be possible. What I did was look at my model at small scale first to confirm it operates as I would expect and then when I scaled it up I ran as a command line application which runs as fast as it can and records the results.
The program is extensible so if you really needed a GUI for your large networks you could program it yourself and link in to OMNeT++ as the simulation backend.
Building Your Network
Having built your nodes in C++ as simple modules you will want to combine them in to a larger networks. These are described in OMNeT++ using the NED language. In the IDE you can either write them yourself or use the drag and drop designer. There are also wizards available for various topologies like grid and random. Modules communicate using gates (a bit like ports on a physical device). You then connect the gates using the connection tool. It does not seem that one to many or many to one connections are possible. So one output can be connected to one input. This can be overcome either by coding a hub type simple node which takes massages in and then duplicates to all outputs. Or you can also send a message direct within your C++ code to a named module.

The NED language allows the addition of parameters which allows you to change variables without changing your code. These can then be set in the projects setting (ini) file. You can set them per module or use wildcards so they change multiple nodes. You can also have multiple configurations for different network topologies for instance. The network itself can be parametric and therefore the number of nodes changed by parameters like columns and rows. This allows you to test at small scale and then for the main run scale everything up easily.
By combining simple modules in to more complicated compound ones you can build complex topologies. You can of course re-use modules between different simulations. This is essentially what add ons like INET do and there are others available through the website here. These mostly cover computer networks but there is no reason that it can only be used for that.
My Example
Once I had completed the Tic-Toc tutorial I wanted to try something else. I decided to declare war. I thought about some simple rule simulations such as Conway's Game of Life. I then decided to make a little war simulation. I used the wizards to produce a parametric grid so I could run it an different scales. The simple node was going to be a Country. I then came up with some simple rules:
- Every country starts peaceful but has a random point in the future when upheaval will occur.
- When upheaval occurs the country becomes an empire and declares war on all its neighbours (left, right, up and down)
- When a country receives a deceleration of war it calculates who wins. If it is peaceful it has set odds and if it is part of an empire different odds.
- If a country looses it becomes part of the winners empire. It then has odds on whether it will continue the campaign. If it does it then it declares war on all its neighbours.
- When a country is attacked but is not defeated there are set odds on whether it will retaliate (declare war on all its neighbours).
These 5 simple rules can produce quite a lot of emergent behaviour. Empires appear and spread out across the board. Their campaign may die out and the empire stops declaring wars. It may be stirred back to life by another empire attacking it but not defeating.
I set up the main parameters so I can adjust them between runs. The parameters are:
- Chance of being defeated in war if peaceful
- Chance of being defeated in war if an empire
- Chance that country retaliates after unsuccessful attack
- Chance that the campaign will be continued after being conquered.
- Time to wait to continue campaign
- Time to wait to launch retaliation
By varying these you can get very different outcomes. The number of empires that rise, the final stable configuration and how long war continues in the world. I use the random functions within OMNeT++ and like all computer random functions they are not really. That means the simulation is deterministic and no matter how many times you run it as long as you change no parameters the outcome will be exactly the same. You can change the random seed though to get different results. Whilst changing the seed will completely change the final winning empire and what specific countries form part of it, the outcome will be the same. If in one run two empires are left at the end then changing the seed will just mean two different ones will be. If you are a mathematician you could produce a proof of this but it is much more visual to find it by running the simulation.
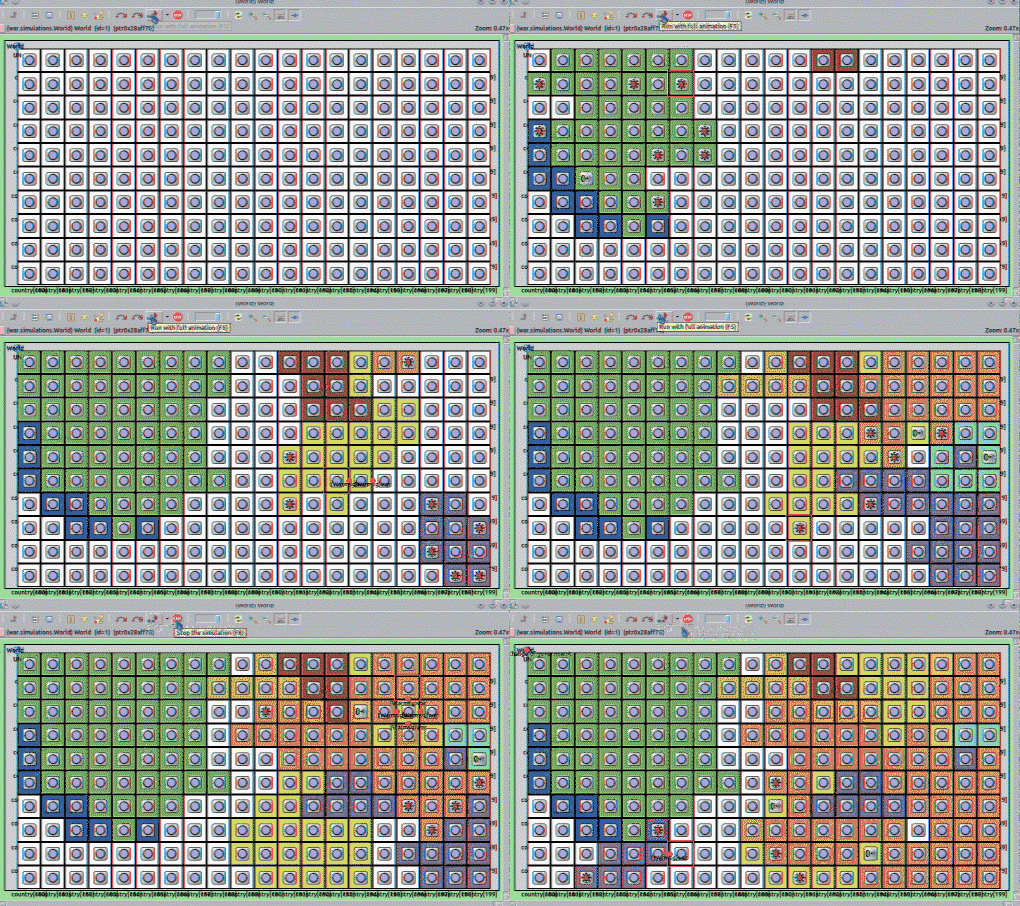
Watching the empires grow and shrink is quite mesmerising (or maybe I am just sad). By looking through the documentation I found out how to change the icon and the background dynamically of a node. So each empire has a colour and the icon shows if it is planning to launch a war, retaliate or is peaceful. This was done in about 100 lines of code and was a fun way to learn OMNeT++

The above gif is a short clip of the start of a simulation. Depending on the parameters the simulation may last a minute or could be hours. In a few runs I ran at full speed and it simulated over 20 million events before I stopped it. In others you get a stable configuration and no more war after a short time. Of course it tells us nothing much about real countries but it does show that even simple models can produce interesting results. If anyone is curious you can download it here. You will need OMNeT++ set up to compile it and it is not documented in any way but should be easy to follow.
Output
Whilst watching your simulation can be informative, especially when you are building it, you will want to be able to catch meaningful metrics from your test run. OMNeT++ provides a number of ways to do this. One way is to capture the log file which shows all events and output. This is just the raw data and would have to be parsed to get anything useful. Capturing the logs also slows down the simulation greatly as it needs to write to disk all the time. There are better ways though, OMNeT++ allows you to capture scalar and vector output. The tic-toc tutorial shows you how to do this for hop count but any numerical output will work. You have to include a few extra calls in your code but it is quite straightforward.
When the run has finished and you return to the IDE you will now have a results folder. You will have .vec or .sca files depending on how you captured. You can open them and in the IDE it gives you comprehensive tools to filter and graph them.

This chart is the number of empires over time. This simulation converged quickly on a stable configuration with 7 empires.
For my scenario I had to think about it a little more. Each country has a limited view and only knows when it is being attacked, planning retaliation and what empire it is part of. If I want to know how large an empire is then it is a bit more involved. I am new to OMNeT++ so this may not be the best way to figure this out, but I added an observer node. This is a simple module that I called UN, each country when it changes government send a message direct to the UN node. The tells it what the old empire was and what the new one is. If it is a new empire then it can add to the map and keep track of the number of countries it rules. It can also subtract one when an empire loses a country. When an empire hits zero it has been wiped out. I can then track the number of empires over time.
You can also produce sequence charts for the messages if that is useful. I have only just begun to understand the options. Ideally I would like to track the empires that emerge over time and show how large they are. My UN node has this information but I do not know the best way to export it yet. I have only read a fraction of the excellent documentation though so I am sure I can figure it out.
Conclusion
OMNeT++ is a powerful tool and much more useful than just TCP/IP network simulation. I will almost certainly use it in the early stages of the development of my network protocol so that I can check the logic without having to worry about the IP aspects. With INET I believe I will then be able to graduate it on to a more faithful simulation of a computer network. I will look at this aspect in my next blog post.
I am new to OMNeT++ and learning fast if anyone with more experience wants to give any pointers then leave a comment below.

